Sunday, July 7, 2024

How to Install or Update the Qualys Cloud Agent on Red Hat Linux

 How to Install or Update the Qualys Cloud Agent on Red Hat Linux


Qualys Cloud Agent is a powerful tool for continuous monitoring and vulnerability management of your systems. This guide will walk you through the steps to install and update the Qualys Cloud Agent on a Red Hat Linux server.

Installation Steps

1. Download the Qualys Cloud Agent Package

First, download the Qualys Cloud Agent package for Linux from the official Qualys website.

2. Unzip the Downloaded Package

Unzip the downloaded package using the following command:
command: unzip QualysCloudAgent-Linux.zip

3. Install the Unzipped Package

Install the Qualys Cloud Agent package using the rpm command:
command: sudo rpm -ivh QualysCloudAgent.rpm

4. Activate the Agent

Activate the Qualys Cloud Agent with your specific Activation ID and Customer ID:
command: sudo /usr/local/qualys/cloud-agent/bin/qualys-cloud-agent.sh ActivationId=<ACTIVATION_ID> CustomerId=<CUSTOMER_ID>

5. Start the Agent Service

Start and enable the Qualys Cloud Agent service to run at boot:
commands:
sudo systemctl start qualys-cloud-agent
sudo systemctl enable qualys-cloud-agent

6. Check Logs (Optional)

Monitor the agent logs to ensure it is functioning correctly:
command: tail -f /var/log/qualys/qualys-cloud-agent.log

7. Check the Installed Version (Optional)

Verify the installed version of the Qualys Cloud Agent:
commands:
rpm -q qualys-cloud-agent 
or
sudo yum info qualys-cloud-agent


Updating the Qualys Cloud Agent

If an older version of the Qualys Cloud Agent is already installed, follow these steps to update to the latest version.

1. Remove Old version

Remove the existing Qualys Cloud Agent (optional, but recommended to ensure a clean installation)

commands:
sudo systemctl stop qualys-cloud-agent
sudo yum remove qualys-cloud-agent

2.Unzip the Updated Package

Unzip the updated package:
command: unzip QualysCloudAgent-Linux.zip

3. Update the Package

Update the Qualys Cloud Agent using the rpm or yum command:
commands:
 sudo rpm -Uvh QualysCloudAgent.rpm
or 
sudo yum update QualysCloudAgent.rpm

4. Restart the Agent Service

Restart the Qualys Cloud Agent service to apply the update
command: sudo systemctl restart qualys-cloud-agent

5. Verify the Updated Version

Check the updated version of the Qualys Cloud Agent:
commands
rpm -q qualys-cloud-agent
or
yum info qualys-cloud-agent


By following these steps, you can easily install and keep your Qualys Cloud Agent up to date on a Red Hat Linux server. This ensures continuous security monitoring and compliance for your systems.


Conclusion

Maintaining up-to-date security tools is crucial for protecting your systems. The Qualys Cloud Agent provides robust capabilities for vulnerability management and continuous monitoring. Follow the steps outlined in this guide to ensure your agent is properly installed and updated.

Ensure to replace <ACTIVATION_ID> and <CUSTOMER_ID> with your specific credentials. For more detailed information, refer to the official Qualys documentation.

Sunday, June 23, 2024

How to Install Docker on Ubuntu 22.04 (Jammy Jellyfish)

 How to Install Docker on Ubuntu 22.04
(Jammy Jellyfish)


Installing Docker on Ubuntu 22.04 is a straightforward process. Follow these steps to get Docker up and running on your system:

Step-by-Step Guide to Install Docker on Ubuntu 22.04

  1. Update the Package List

    First, ensure your package list is up to date:
    command: sudo apt update

  2. Install Required Packages

    Install the necessary packages for Docker installation:
    command: sudo apt install apt-transport-https ca-certificates curl software-properties-common

  3. Add the Docker GPG Key

    Add Docker’s official GPG key to your system:
    command: curl -fsSL https://download.docker.com/linux/ubuntu/gpg | sudo gpg --dearmor -o /usr/share/keyrings/docker-archive-keyring.gpg

  4. Add the Docker Repository

    Set up the Docker repository:
    command: echo "deb [arch=$(dpkg --print-architecture) signed-by=/usr/share/keyrings/docker-archive-keyring.gpg] https://download.docker.com/linux/ubuntu $(lsb_release -cs) stable" | sudo tee /etc/apt/sources.list.d/docker.list > /dev/null

  5. Update the Package List Again

    Refresh your package list to include Docker’s repository:
    command: sudo apt update

  6. Install Docker

    Install Docker CE (Community Edition):
    command: sudo apt install docker-ce

  7. Verify Docker Installation

           Check that Docker is installed and running:
           command: sudo systemctl status docker


By following these steps, you will successfully install Docker on your Ubuntu 22.04 system, allowing you to start leveraging Docker containers for your projects.

For more detailed guides and troubleshooting, refer to the official Docker documentation.


How to install Docker in Redhat


Saturday, June 15, 2024

 Deploying Your First Docker Image Using Kubernetes: A Step-by-Step Guide

 Deploying Your First Docker Image Using Kubernetes: A Step-by-Step Guide


Deploying a Docker image via Kubernetes can seem daunting at first, but with this comprehensive guide, you'll be able to deploy your first Docker image with ease. Follow these steps to get your application up and running using Kubernetes and Minikube.

Prerequisites

Before starting, make sure you have kubectl and Minikube installed on your local machine. Verify the installations by executing the following commands:

  • command: kubectl version --client 
  • command: minikube status
If you have not already installed Minikube and kubectl, or if you encounter errors, refer to our installation guide: Introduction to Kubernetes and Minikube Installation.


Step-by-Step Guide to Deploying via Kubernetes

1. Create a Deployment

First, you need to create a deployment. Use the following command, replacing deploymentName with your desired deployment name and imageName with your Docker image name:

command: kubectl create deployment deploymentName --image=imageName


2. Verify the Deployment

To ensure that your deployment and pods are running, execute:

  • command: kubectl get deployments
  • command: kubectl get pods


3. Bind the Port

Next, bind the port. Assuming your Docker image exposes port 3000 internally, you can expose this port externally using the following command

command:kubectl expose deployment deploymentName --type=LoadBalancer --port=3000


4. Notify Minikube

Finally, inform Minikube about the service. This will provide you with a URL to access your application. Run:
command: minikube service deploymentName


Copy the provided URL and paste it into your browser to see your application in action.


Copy the provided URL and paste it into your browser to see your application in action.


Rolling Out Updates

Once your application is deployed, you might need to update it. Rolling out updates in Kubernetes is straightforward. Use the following command to update your deployment with a new image version:


command: kubectl set image deployment deploymentName containerName=newImageName:newTag

Verify the rollout status with the command: kubectl rollout status deployment deploymentName


now  you can see on the same service/url my updated image is running


Rolling Back Updates

If something goes wrong with your update, you can easily roll back to the previous version. Use the following command to roll back the deployment:

command:kubectl rollout undo deployment/deploymentName


after running the rollout undo command hit your Project URL again you will see your project is rolled back to the previous version


Conclusion

By following these steps, you can easily deploy your first Docker image using Kubernetes and Minikube. This guide helps streamline the process, ensuring a successful deployment. With these foundational skills, you can explore more advanced features of Kubernetes and enhance your containerized applications further.

For more detailed information on Kubernetes and Docker, check out our other blog posts and tutorials. Happy deploying!


Friday, June 14, 2024

Introduction to Kubernetes and Installation on Red Hat Linux


Introduction to Kubernetes


Kubernetes, often abbreviated as K8s, is a powerful open-source platform designed to automate deploying, scaling, and operating application containers. Here's a quick overview of its key concepts:

  • Nodes: Individual servers in the Kubernetes architecture.
  • Cluster: A group of nodes working together.
  • Pods: The smallest deployable units in Kubernetes, which run containers on nodes.

Master Components of Kubernetes

The Kubernetes master components manage the cluster and its workload:

  • API Server: Provides the CLI and RESTful API interface for interaction.
  • Scheduler: Assigns nodes to newly created pods.
  • ETCD: A key-value store that holds the entire cluster's state, including nodes and pods.
  • Control Manager: Ensures the desired state of the cluster is maintained.

Worker Node Components

Worker nodes run the applications and perform the following functions:

  • Kubelet: Ensures that containers are running in pods.
  • Kube Proxy: Manages network rules to enable communication with pods.
  • Container Runtime: Runs the containers.

Kubernetes Installation on Red Hat Linux

Step 1: Install Kubectl

 1. Update the Repository:

command: "cat <<EOF | sudo tee /etc/yum.repos.d/kubernetes.repo
[kubernetes]
name=Kubernetes
baseurl=https://pkgs.k8s.io/core:/stable:/v1.30/rpm/
enabled=1
gpgcheck=1
gpgkey=https://pkgs.k8s.io/core:/stable:/v1.30/rpm/repodata/repomd.xml.key
EOF
"

2. Install Kubectl:

command: sudo yum install -y kubectl

3. Verify Installation:

command: kubectl version --client


Step 2: Install Minikube

Minikube is a tool that makes it easy to run Kubernetes locally, ideal for learning and development purposes.

1. Download Minikube:

command: curl -LO https://storage.googleapis.com/minikube/releases/latest/minikube-latest.aarch64.rpm

2. Install Minikube:

command: sudo rpm -Uvh minikube-latest.aarch64.rpm

3. Start Minikube:

command: minikube start


Handling Sudo User Permission Errors

If you encounter permission errors as a sudo user, follow these steps

 - Switch User:

if you are logged in as a sudo user switch to any other use or create a new user I have user Danish already

command: su - username

 - Add User to Docker Group:

command: sudo usermod -aG docker $USER && newgrp docker

after adding this user to the group now start the minikube again 


 - Edit the Sudoers File
(if still getting error):

  • Use visudo to add your user, ensuring proper permissions
  • After resolving permissions, run: minikube start


Check Minikube Status:

To check the status of the running status of the minikube run the following command
command: minikube status


By following these steps, you can effectively set up and manage a Kubernetes environment on Red Hat Linux. This guide should help you get started with Kubernetes, providing a strong foundation for further exploration and learning.

Wednesday, June 5, 2024

Simplifying Docker Operations with Docker Compose


Introduction:

Docker Compose revolutionizes Docker image management by eliminating the need for repetitive command typing. Instead of manually executing complex Docker run commands each time, Docker Compose allows effortless container management through a simple configuration file.


Installing Docker Compose

  • Ensure Docker is installed and operational by running docker --version.

  • Download Docker Compose using command:
    sudo curl -L "https://github.com/docker/compose/releases/latest/download/docker-compose-$(uname -s)-$(uname -m)" -o /usr/local/bin/docker-compose

  • Grant executable permissions to Docker Compose command:
    sudo chmod +x /usr/local/bin/docker-compose

  • Create a symbolic link for easy access command :
    sudo ln -s /usr/local/bin/docker-compose /usr/bin/docker-compose

  • Verify the installation with command : docker-compose --version

Running Single Images with Docker Compose:

  • Create a docker-compose.yml file

  • Configure the services and their dependencies in the file.

  • Execute the command docker compose up to launch the containers.


Optimizing Docker Operations:

Running Multiple Containers:
Docker Compose allows running multiple containers simultaneously with ease. By defining services in the docker-compose.yml file, Docker Compose automatically handles network creation and inter-container communication. we can also use the port binding and resolve the dependency of the container if they are dependent on each other


Another Example:

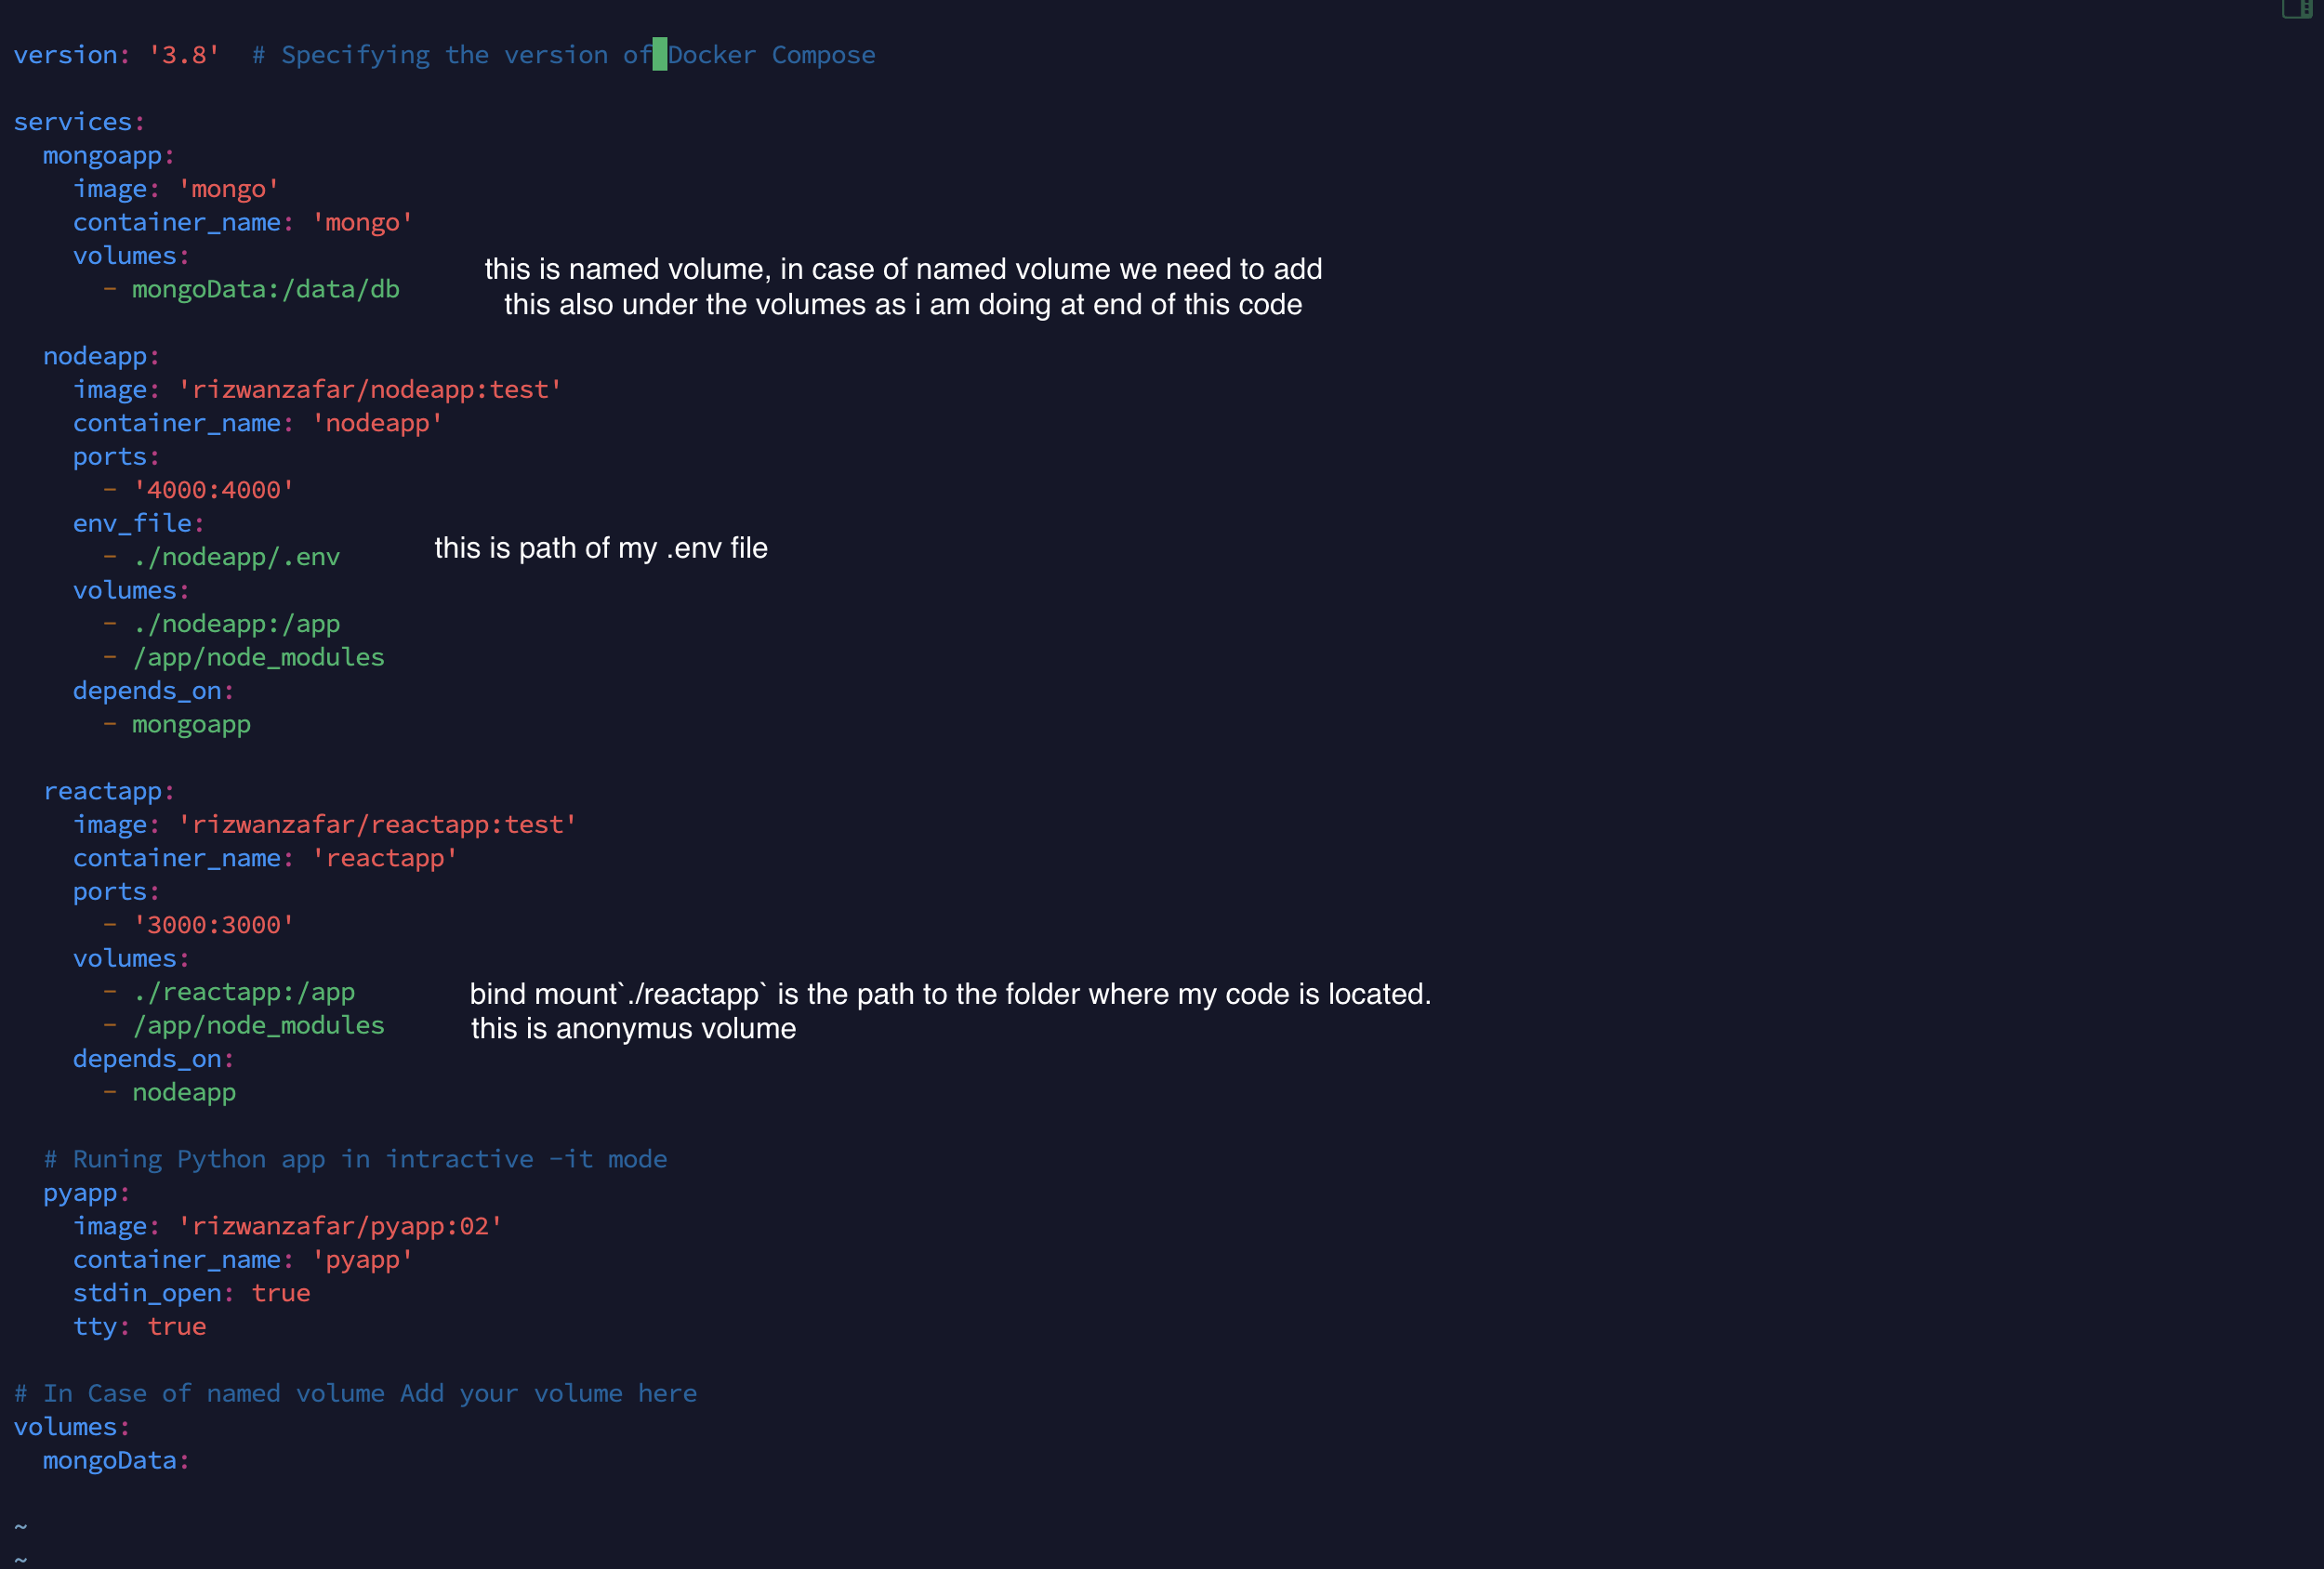
Now, we are working with a separate Docker Compose file from the one mentioned earlier, this file includes named volumes, anonymous volumes, and bind mounts. Additionally, it runs a Docker image configured with an .env file. This setup ensures efficient volume management and environment configuration for seamless application deployment.


Running Specific Services:

If you only need to run a specific service from the docker-compose.yml file, Docker Compose provides the flexibility to target individual services for execution.


Network Creation:

Docker Compose simplifies network management by automatically creating networks for connected containers. This seamless connectivity enhances communication between containers, fostering efficient application development and deployment.


Stopping and Cleaning Up:


To halt Docker Compose and remove all associated containers and networks, utilize the command demonstrated below.


By leveraging Docker Compose, developers can streamline Docker operations, improve workflow efficiency, and simplify container management tasks.

Meta Description: Learn how Docker Compose streamlines Docker image management and simplifies running multiple containers with ease.

Monday, June 3, 2024

Docker Bind Mount: Keeping Your Containers Updated


 Docker Bind Mount: Keeping Your Containers Updated


When working with Docker, you might encounter scenarios where a local file needs to be in sync with a file inside a Docker container. This is where Docker bind mounts come into play. Bind mounts allow you to bind a file or directory on your host machine to a file or directory inside your container. Bind mount is part of docker volume here are some key difference between anonymes volum , named volume and bind mount


 What is a Docker Bind Mount?


A Docker bind mount allows a file or directory from your host machine to be directly accessible within a container. This means that any updates to the local file are immediately available inside the container.


 Example Scenario


Consider you have a file located at `/opt/issues.txt` on your host machine. Your Docker container is designed to manage and process issues listed in this file. However, if the `/opt/issues.txt` file is updated on the host machine, the Docker container won't see these updates because the file exists outside the container.


To solve this, you can use a bind mount to link the `/opt/issues.txt` file on your host machine with a file inside the Docker container. This way, any updates to the local file are instantly reflected inside the container.


 How to Use Docker Bind Mount


Here's a step-by-step example of how to set up a bind mount:


1. **Identify the local file and the target path inside the container**: 

     note: make sure the local path is the absolute 

   - Local file: `/opt/issues.txt`

   - Target path inside the container: `/container/issues.txt`


2. **Run the Docker container with the bind mount**:

   ```bash

   docker run -d -v /opt/issues.txt:/container/issues.txt --rm  imageID

   ```


 Breakdown of the Command


- `docker run`: Starts a new Docker container.

- `-v /opt/issues.txt:/container/issues.txt`: The `-v` flag specifies the bind mount. The local file path (`/opt/issues.txt`) is mapped to the target path inside the container (`/container/issues.txt`).

- `--rm`: Automatically removes the container when it exits.

- `imageID`: The ID of the Docker image you want to run.


3. By default, bind mounts in Docker are set to read and write mode. This allows changes made outside the container to be reflected inside it, but it also means the container can modify your external files, which can be risky. To enhance security and maintain the integrity of your files, you can use read-only bind mounts. This setup ensures that while you can update files from outside the container, the container itself cannot alter your external files or code. Using read-only bind mounts is a best practice for protecting your development environment and ensuring consistency.

command 
```bash

   docker run -d -v /opt/foldername:/container/foldername:ro --rm  imageID

   ```

Note : above step will make each and everything readonly but let in case you want something should be writeable for container as well then we can do this by adding anonymous volume .


```bash

   docker run -d -v /opt/foldername:/container/foldername:ro -v /container/folder_want_to_readable --rm  imageID

   ```

 Benefits of Using Bind Mounts


- Immediate Updates: Any changes to the local file are instantly available inside the container.

- Persistent Data: Data in bind-mounted files persists even if the container is removed, making it ideal for development and debugging.

- Flexibility: Easily share files between the host and the container without rebuilding the Docker image.


 Conclusion

Docker bind mounts are a powerful feature that helps you keep your containers synchronized with the host machine. By using bind mounts, you can ensure that your container has access to the most up-to-date information, improving the efficiency and reliability of your containerized applications.


Optimize your workflow and keep your containers updated with Docker bind mounts!


 Docker, bind mount, Docker container, local file sync, Docker run, container synchronization, Docker volumes, persistent data.


Meta Description: Learn how to use Docker bind mounts to keep your containers synchronized with local files. Ensure your Docker container always has the latest updates from your host machine.

Thursday, May 30, 2024

 How to Install Docker on Red Hat Linux | Redhat

 How to Install Docker on Red Hat Linux


Main Components of Docker

Understanding Docker's key components is essential for effective use:

1. Docker File: A script with instructions to build Docker images.

2. Docker Image: A lightweight, standalone, executable package with everything needed to run a piece of software.

3. Docker Container: A runtime instance of a Docker image.

4. Docker Registry: A storage and distribution system for Docker images.


 Step-by-Step Guide to Installing Docker on Red Hat


 Step 1: Install Yum Utilities

First, you need to install the `yum-utils` package to manage your repositories efficiently. Open your terminal and run:


command: sudo yum install -y yum-utils


 Step 2: Add the Docker Repository

Next, add the Docker repository to your system to ensure you get the latest version. Execute the following command:


command: sudo yum-config-manager --add-repo https://download.docker.com/linux/centos/docker-ce.repo


Step 3: Install Docker

Now, you can install Docker and its associated components. Run the following command to install Docker Engine, CLI, and necessary plugins:

command: sudo yum install docker-ce docker-ce-cli containerd.io docker-buildx-plugin docker-compose-plugin


 Step 4: Start Docker

Finally, start the Docker service with the command:

command: sudo systemctl start docker


For more detailed information, you can refer to the official Docker documentation [here](https://docs.docker.com/engine/install/centos/).


By following these steps, you will have Docker up and running on your Red Hat Linux system. Happy containerizing!


Monday, January 22, 2024

 Mastering Linux Basics: Essential Commands Every User Should Know

 Mastering Linux Basics: Essential Commands Every User Should Know

Monday, September 4, 2023

How to create Open SSL and Implement in Virtual Host

Here we will talk about how we can create new openssl and then how we can impliment the new openssl. on our linux server. just follow this blog step by step


Create Open SSL

first of all install open ssl module in your server, follow the following command to install and verify ssl instalation.
sudo apt-get install openssl -y //install ssl
which openssl //verify installation
create a empty folder and then create ssl using following command in that folder.
  • openssl: This is the command to use OpenSSL, a tool for working with cryptographic operations and certificates.

  • req: This tells OpenSSL that you want to perform certificate request-related operations.

  • -new: It means you want to create a new certificate request.

  • -newkey rsa:4096: This part tells OpenSSL to generate a new RSA private key with a size of 4096 bits. RSA is a type of cryptographic algorithm used for secure communication.

  • -x509: This option tells OpenSSL that you want to create a self-signed certificate, which means you're both the issuer and the subject of the certificate.

  • -days 365: Here, you specify that you want the certificate to be valid for 365 days, meaning it will expire after a year.

  • -nodes: This means you don't want to encrypt the private key with a passphrase. It makes the private key unprotected. if you want add protection layer then don't add this property in final command

  • -out MyCert.crt: This specifies the name of the output file where the certificate will be saved. In this case, it will be saved as "MyCert.crt."

  • -keyout Mykey.key: This specifies the name of the output file where the private key will be saved. In this case, it will be saved as "Mykey.key."

 So Final command :

openssl req -new -newkey rsa:4096 -x509 -days 365 -nodes -out MyCert.crt -keyout Mykey.key


Implement SSL in Virtual Host | Server

go to site-available folder for this you can do

cd /etc/apache2/sites-available
open virtual host file in editing mode 

sudo vim leran-test.conf
now in this file make following changes
  • change port 80 to 443
  • add this line(SSLEngine on)
  • add ( SSLCertificateFile /etc/ssl/certs/YourCrtFileName.crt )
  • add ( SSLCertificateKeyFile /etc/ssl/yourKeyFileName.key )

 
Now enable your ssl module  and disable default ssl, and restart apache service using following command

a2enmod ssl //enable your ssl

a2dissite default-ssl.conf //disable default ssl

sudo systemctl reload apache2 //will reload apache service

Now hit your domain with https, then it will work fine


Thanks.

Apache Configuration on Linux

 Here we will talk about how we can install and configure in Linux. we will deploy a site and will access it with DNS


Install Apache on Linux

To install Apache on Linux run following command step by step

sudo apt update

sudo apt update
sudo apt install apache2

now check apache is running or not to check you can run.(if the status is running then fine and apache installed and running successfully)

sudo systemctl status apache2


But if your apache status not running then for this you must need to enable and start it, by using following commands you can eamable and start appache2

Enable

sudo systemctl enable apache2
sudo systemctl start apache2

now hit 127.0.0.1 in browser and if it load the following page then its working fine


Deploy Website on DNS

To deploy our website on DNS (Domain Name Server) we need create virtual host first

Create VirtualHost

go to site-available folder for this you can do

cd /etc/apache2/sites-available

create here one more file to create virtual host for your site to create file your can run following command . this command will create file and will open your file in editor. after pasting following code in your file click esc button and then :wq your file will be saved

sudo vim leran-test.conf

now add following code in this file

<VirtualHost *:80>


ServerAdmin test@test

DocumentRoot /var/www/test

ServerName learn.test

ServerAlias www.learn.test

ErrorLog ${APACHE_LOG_DIR}/error.log

CustomLog ${APACHE_LOG_DIR}/access.log combined


</VirtualHost>

  • serverAdmin could be your server Eamil
  • DocumentRoot : add the path of your website's index page. (the site that i  want to deploy is stored  on /var/www/test.  ) in you case verify your site directory path
  • ServerName: add domain name with out www
  • ServerAlias: add domain name with www


Register your site in Hosts file

before registration of this domain name you must know about your local ip address to get this type following command .

sudo ifconfig
under enp0s1: with inet 192.168.64.2 will be  your local ip


Now we need to register our hosting in hosts file goto your etc folder and then open hosts file
cd /
cd etc
sudo vim hosts
now first type your ip and then your domain name like ( Example 192.168.64.2   learn.net) and then click esc button :wq to save and exit


Now  enable your site and reload the apache service by using following command

sudo a2ensite learn-test.conf // its your virtual host file name
sudo systemctl reload apache2 // it will reload appache service
and now hit your DNS in browser it will be work fie 


So  We have deployed website successfully 

Thanks